Overview
In this webpage, we help you create the Haulin' Hot Wheels Laser Cutting Creation.
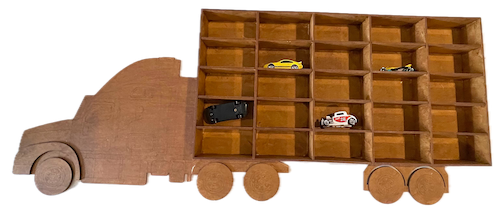
This laser-cut truck-shaped car holder is a perfect project for Hot Wheels enthusiasts! Featuring a semi-truck design with storage compartments that neatly hold and display miniature cars, it’s a creative way to organise and showcase a collection. The design files and instructions are available for download, making it easy to assemble this fun and functional piece. It’s an ideal gift for kids and car lovers—fun to build and practical to use!
- The Haulin' Hot Wheels laser cutting Creation is a toy.
- A meaningful gift for children.
- The construction uses plywood.
- It is an a challenging Creation, and I expect it can be completed in 4 hours.
However, the time required for completion will depend on the laser cutter you use, the overall size of the project, and your familiarity with laser cutting. If you think the timing should be adjusted, you’re welcome to let me know via a comment below.
The paid design can be downloaded here. (please notify me if the link is down)
Project instructions
Note: the project should be cut from 3mm plywood. Consider applying the stain or dye before laser cutting.

Step 1. Prepare all materials for cutting

- Plywood: Choose a stain or a dye to be applied after laser cutting to enhance the natural wood texture.

Step 2. Prepare design files for cutting

- download the design file from the provided link supplied on the project page.
- unzip the file to access the design files.
- open the design within your laser cutting software.

Step 3. Set up the laser cutter correctly

- Don't resize; otherwise, the project won't fit together. Move the pieces around to fit onto your plywood.
- Set the appropriate laser parameters:
- Cut: Specify power and speed for clean cuts.
- Review your laser cutter’s documentation for material-based settings.

Step 4. Run the laser cutter

- Lay the material flat on the laser bed.
- Run the cutting process for all required pieces.

Step 5. Complete finishing after cutting

- For Plywood: Wipe smoke marks away with a slightly damp rag. If you still need to, apply the wood stain or dye.

Step 6. Assemble and secure all layers

- Use appropriate adhesives:
- Wood Glue for plywood.
- Follow the instructions provided from the place you purchased the design file.

Congratulations on completing Haulin' Hot Wheels! Your project is complete and ready to be enjoyed.

     If you enjoyed this project, please share your experience and leave a comment below.
Looking for guidance?
- Leave a question
The completed Haulin' Hot Wheels