Intro
In this feature, we help you create the Love in Geometrics Laser Cutting Design.
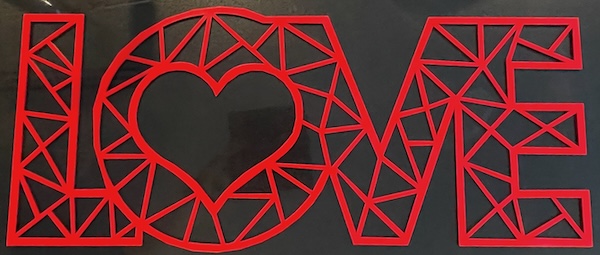
This modern geometric "LOVE" sign adds a unique twist to the classic word art. Created with intricate laser-cut lines and a heart in place of the "O," this design is perfect for Valentine's Day, weddings, or any decor setting that needs a pop of love! Download the design files and get help with a few tips to create your version of this striking piece.
- The Love in Geometrics laser cutting Design is a wall artwork.
- Well suited as a gift for all ages.
- This laser cut project uses acrylic or MDF or plywood.
- It is an an easy Design, and the project can usually be completed in 1.75 hours for plywood, 2.25 hours for MDF or 1.25 hours for acrylic.
However, the time required to complete this will depend on the laser cutter used, the overall size of the project, and your confidence with laser cutting. If you think the timing should be adjusted, you can share feedback via a comment below.
The free design can be downloaded here. (please notify me if the link is down)
Assembly instructions
Step 1. Prepare all materials for cutting

- Acrylic: Choose the acrylic colour and use a protective film if required.
- MDF: Prepare MDF by painting it with a white undercoat and selecting a paint colour to finish after the laser cutting.
- Plywood: Choose stains or dyes to be applied after laser cutting to enhance the natural wood texture.

Step 2. Set up the project design files

- download the design file via the provided source link supplied on the project page.
- Unzip the file to access the SVG.
- Load the SVG into your laser cutting software.

Step 3. Set up your laser cutter and settings

- Adjust the design size to fit your chosen material dimensions.
- Set the appropriate laser parameters:
- Cut: Specify power and speed for clean cuts.
- Use the manufacturer’s guidance when selecting material-specific parameters.

Step 4. Begin the laser cutting process

- Set the material in place on the laser bed.
- Run the cutting process.

Step 5. Clean and finish the cut pieces

- For MDF: Use a damp cloth to remove smoke marks. Paint the layers once clean. Spray paint gives the best finish.
- For Plywood: Clean smoke residue with a damp rag, then apply stain or dye.
- For Acrylic: Remove protective film after cutting.

Step 6. Assemble the finished layers

- Attach a hanging mechanism, such as adhesive strips, to the back of the artwork.
- Verify that the mechanism is suitable for the wall surface.

You’ve brought it all together and completed Love in Geometrics! Enjoy the finished design and the satisfaction of making it yourself.

     If you enjoyed this project, please share your experience and leave a comment below.
Need help?
- Create sample swatches of your paints, stains and dyes for laser cutting
- 20 Laser Engraving Tips
- 50 Laser Cutting tips
- Leave a question
The completed Love in Geometrics