Outline

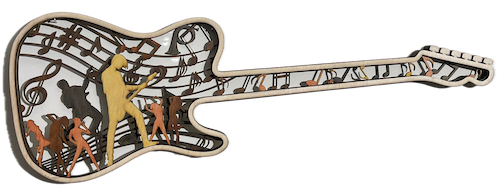
In this post, we help you create the Rock On Musical Guitar Laser Cutting Work.
Create this stunning guitar-shaped artwork with intricate musical notes, dancing figures, and guitar shape from layered wood or acrylic sheets. Assemble the layers to form a dynamic 3D effect. This project is perfect for music lovers and laser cutting enthusiasts seeking a unique decor piece.
- The Rock On Musical Guitar laser cutting Work is a wall artwork.
- Ideal as a gift for all ages.
- This laser cut design uses MDF or plywood.
- It is an an intermediate Work, and this can usually be completed in 4 hours for plywood and 4.75 hours for MDF.
However, the time required to complete this will depend on the laser cutter used, the final dimensions of the design, and your confidence with laser cutting. If you believe the completion time should be adjusted, please feel free to let me know via a comment below.
The free design can be downloaded here. (please notify me if the link is down)
Assembly instructions
Step 1. Begin with material preparation

- MDF: Prepare MDF by painting it with a white undercoat and selecting paint colours to finish after the laser cutting.
- Plywood: Choose stains or dyes to be applied after laser cutting to enhance the natural wood texture.

Step 2. Ready the design file for cutting

- download the design file using the source link shown on the project page.
- Unzip the file to access the SVG.
- Load the SVG into your laser cutting software.

Step 3. Set laser parameters for cutting

- Adjust the design size to fit your chosen material dimensions.
- Set the appropriate laser parameters:
- Cut: Specify power and speed for clean cuts.
- Refer to the laser cutter manual for recommended material settings.

Step 4. Carry out the laser cutting steps

- Place the material correctly on the laser bed.
- Run the cutting process for all required layers.
- Ensure that the layers align correctly as they are cut.

Step 5. Clean and prepare pieces after cutting

- For MDF: Wipe smoke marks away with a slightly damp rag. Paint the layers with your chosen colours. Spray paint is preferable to canned paint.
- For Plywood: Wipe smoke marks away with a slightly damp rag. Apply the wood stain or dye.

Step 6. Build the final layered design

- Align the layers carefully to ensure proper alignment of the design.
- Use appropriate adhesives:
- Wood Glue for MDF or plywood.
- Use clamps to secure the layers while the adhesive dries.
- For MDF and plywood, use a gloss spray to enhance and protect the artwork.

Step 7. Ready the piece for mounting

- Attach a hanging mechanism, such as adhesive strips, to the back of the artwork.
- Verify that the mechanism is suitable for the wall surface.

You’ve brought it all together and completed Rock On Musical Guitar! Take pride in the result and enjoy showing it off.

     If you enjoyed this project, please share your experience and leave a comment below.
Questions about this project?
- Laser Cutting: A Beginner’s Guide to Getting Started
- 50 Laser Cutting tips
- Create sample swatches of your paints, stains and dyes for laser cutting
- Leave a question
The completed Rock On Musical Guitar
