Intro
In this post, we help you create the Dark Knight's Layered Legacy Laser Cutting Build.
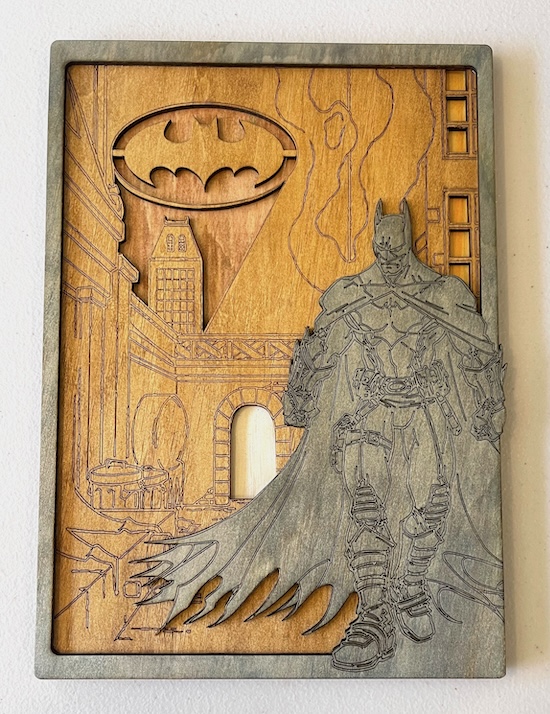
This laser-cut artwork features a stunning depiction of Batman standing heroically against a Gotham City backdrop. The iconic Bat Signal illuminates the sky, calling the Dark Knight to action. The intricate layering and engraved details bring the scene to life, showcasing the dark, moody atmosphere of the city. Perfect for superhero fans, this piece captures the essence of Gotham’s protector, combining artistry with a tribute to an enduring legend.
- The Dark Knight's Layered Legacy laser cutting Build is a wall artwork.
- Makes a thoughtful gift for children.
- This build uses plywood.
- It is an an easy Build, and I estimate this can be completed in 2.5 hours.
However, the completion timeframe will depend on the laser cutter you use, the finished size of the design, and your experience using similar designs. If you feel the time estimate should be adjusted, feel free to share your thoughts via a comment below.
The free design can be downloaded here. (please notify me if the link is down)
Build instructions
Step 1. Prepare materials before starting

- Plywood: Choose stains or dyes to be applied after laser cutting to enhance the natural wood texture. Use black for the front layer; you may want to stain the bat symbol in black, too. The rear layer contains colours for the six windows, door and the bat signal background.

Step 2. Ready the design file for cutting

- download the design file via the provided source link listed on the project page.
- Unzip the file to access the SVG.
- Load the SVG into your laser cutting software.

Step 3. Adjust laser settings for the materials

- Adjust the design size to fit your chosen material dimensions.
- Set the appropriate laser parameters:
- Cut: Specify power and speed for clean cuts.
- Score: Specify power and speed to ensure the scoring can be visible once the stain is applied.
- Refer to your laser cutter’s guidelines for material-specific settings.

Step 4. Laser cut all design layers

- Set the material in place on the laser bed.
- Run the cutting processes for all required pieces.

Step 5. Finish materials after cutting

- For Plywood: Wipe smoke marks away with a slightly damp rag. Apply the wood stain or dye.

Step 6. Join the layers together

- Use appropriate adhesives:
- Wood Glue for plywood.

Step 7. Get the piece ready to hang

- Attach a hanging mechanism, such as adhesive strips, to the back of the artwork.
- Verify that the mechanism is suitable for the wall surface.

All steps are finished — you’ve completed Dark Knight's Layered Legacy! Put it on display and enjoy the finished look.

     If you enjoyed this project, please share your experience and leave a comment below.
Need help with this build?
- Create sample swatches of your paints, stains and dyes for laser cutting
- 25 Common Laser Cutting Mistakes and How to Avoid Them
- 50 Laser Cutting tips
- Leave a question
The completed Dark Knight's Layered Legacy